
目次
この記事の著者

データサイエンティスト / ブロガー
たぬ
tanu
プロフィール
福岡在住のデータサイエンティスト。Pythonでルーチンワークを瞬殺する仕組みを作ることやデータを視覚化することが得意です。
前提条件
CHECK.1
ディレクトリ
ディレクトリ
flask/
┣ app.py
︙
┗ templates/
┗ index.html
┣ app.py
︙
┗ templates/
┗ index.html
ターミナル(コマンドプロンプト)のカレントディレクトリは、 flaskフォルダにあるものとします。
CHECK.2
app.py app.py
# -*- coding: utf-8 -*-
from flask import Flask, render_template

app = Flask(__name__)

@app.route('/')
def index():
	return render_template('index.html')

if __name__ == '__main__':
	app.run()
CHECK.3
index.html index.html
<!doctype html>
<html lang="ja">
  <head>
    <meta charset="utf-8">
    <meta name="viewport" content="width=device-width, initial-scale=1, shrink-to-fit=no">
    <title>Hello Jinja2</title>
  </head>
  <body>
    <h1>Hello Jinja2</h1>
    <p>Jinja2でHTMLファイルを読み込みことに成功しました。</p>
  </body>
</html>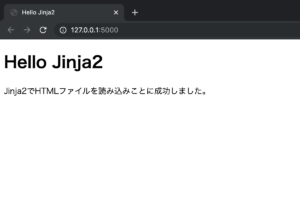
END
値を渡す
STEP.1
app.pyを修正する app.py
# -*- coding: utf-8 -*-
from flask import Flask, render_template

app = Flask(__name__)

@app.route('/')
def index():
	title = 'world'
	framework = 'Flask'
	return render_template('index.html', title=title, framework=framework)

if __name__ == '__main__':
	app.run()
STEP.2
index.htmlを修正する index.html
<!doctype html>
<html lang="ja">
  <head>
    <meta charset="utf-8">
    <meta name="viewport" content="width=device-width, initial-scale=1, shrink-to-fit=no">
    <title>Hello {{ title }}</title>
  </head>
  <body>
    <h1>Hello {{ title }}</h1>
    <p>{{ framework }}でHTMLファイルを読み込みことに成功しました。</p>
  </body>
</html>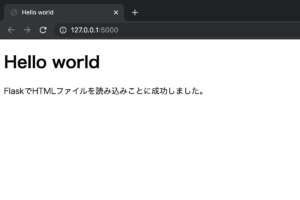
END
リストを渡す
1次元配列
STEP.1
app.pyを修正する app.py
# -*- coding: utf-8 -*-
from flask import Flask, render_template

app = Flask(__name__)

@app.route('/')
def index():
	arr1d = ['愛媛県', '高知県', '徳島県', '香川県']
	return render_template('index.html', arr=arr1d)

if __name__ == '__main__':
	app.run()
STEP.2
index.htmlを修正する index.html
<!doctype html>
<html lang="ja">
  <head>
    <meta charset="utf-8">
    <meta name="viewport" content="width=device-width, initial-scale=1, shrink-to-fit=no">
    <title>Hello World</title>
  </head>
  <body>
    <h1>四国一覧</h1>
    <ul>
        <li>{{ arr[0] }}</li>
        <li>{{ arr[1] }}</li>
        <li>{{ arr[2] }}</li>
        <li>{{ arr[3] }}</li>
    </ul>
  </body>
</html>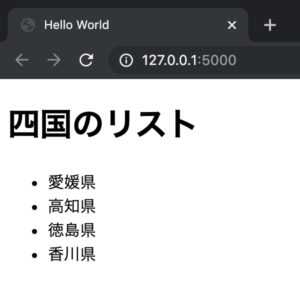
STEP.X
【発展】forループで書き出す
index.html(before)
<ul>
    <li>{{ arr[0] }}</li>
    <li>{{ arr[1] }}</li>
    <li>{{ arr[2] }}</li>
    <li>{{ arr[3] }}</li>
</ul>上の部分のHTMLは、Jinja2のfor inブロックで次のように書き換えることができます。
index.html(after)
<ul>
{% for i in arr %}
    <li>{{ i }}</li>
{% endfor %}
</ul>
END
2次元配列
STEP.1
app.pyを修正する app.py
# -*- coding: utf-8 -*-
from flask import Flask, render_template

app = Flask(__name__)

@app.route('/')
def index():
	arr_2d = [['a', 'b', 'c', 'd'], ['A', 'B']]
	return render_template('index.html', arr=arr_2d)

if __name__ == '__main__':
	app.run()
STEP.2
index.htmlを修正する index.html
<!doctype html>
<html lang="ja">
  <head>
    <meta charset="utf-8">
    <meta name="viewport" content="width=device-width, initial-scale=1, shrink-to-fit=no">
    <title>Hello World</title>
  </head>
  <body>
    <h1>二次元配列を表示させる</h1>
    <ul>
        <li>{{ arr[0][0] }}</li>
        <li>{{ arr[0][1] }}</li>
        <li>{{ arr[0][2] }}</li>
        <li>{{ arr[0][3] }}</li>
        <li>{{ arr[1][0] }}</li>
        <li>{{ arr[1][1] }}</li>
    </ul>
  </body>
</html>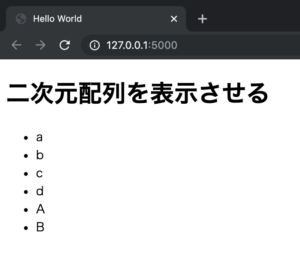
STEP.X
【発展】forループで書き出す
index.html(before)
<ul>
    <li>{{ arr[0][0] }}</li>
    <li>{{ arr[0][1] }}</li>
    <li>{{ arr[0][2] }}</li>
    <li>{{ arr[0][3] }}</li>
    <li>{{ arr[1][0] }}</li>
    <li>{{ arr[1][1] }}</li>
</ul>上の部分のHTMLは、Jinja2のfor inブロックで次のように書き換えることができます。
index.html(after)
<ul>
{% for i in arr %}
    {% for j in i %}
    <li>{{ j }}</li>
    {% endfor %}
{% endfor %}
</ul>
END
辞書型配列を渡す
STEP.1
app.pyを修正する app.py
# -*- coding: utf-8 -*-
from flask import Flask, render_template

app = Flask(__name__)

@app.route('/')
def index():
	fruit_dict = {'orange':100, 'apple':200, 'cherry': 400}
	return render_template('index.html', fruit=fruit_dict)

if __name__ == '__main__':
	app.run()
STEP.2
index.htmlを修正する index.html
<!doctype html>
<html lang="ja">
  <head>
    <meta charset="utf-8">
    <meta name="viewport" content="width=device-width, initial-scale=1, shrink-to-fit=no">
    <title>Hello World</title>
  </head>
  <body>
    <h1>辞書型配列を表示させる</h1>
    <ul>
        <li>オレンジ:{{ fruit.orange }}</li>
        <li>りんご:{{ fruit.apple }}</li>
        <li>さくらんぼ:{{ fruit.cherry }}</li>
    </ul>
  </body>
</html>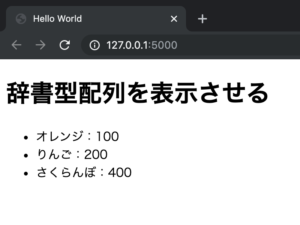
STEP.X
【発展】forループで書き出す
index.html(before)
<ul>
    <li>オレンジ:{{ fruit.orange }}</li>
    <li>りんご:{{ fruit.apple }}</li>
    <li>さくらんぼ:{{ fruit.cherry }}</li>
</ul>上の部分のHTMLは、Jinja2のfor inブロックで次のように書き換えることができます。
index.html(after)
<ul>
{% for key, value in fruit.items() %}
    <li>{{ key }}:{{ value }}</li>
{% endfor %}
</ul>
END
連載目次:FlaskでWebアプリケーションを開発するためのロードマップ
入門編:10記事
入門編の10記事を順に読んでいけば、FlaskでWebアプリケーションを開発する必要最小限のことが学べます。
簡単なアプリケーションであれば、セキュリティ上の観点を考慮しなかった場合公開できるでしょう。
- Flaskを『ローカルで開発する環境構築』から『プログラムの実行まで』を一通り
FlaskでWebアプリケーションを作る『全体の流れ』を大まかに理解する- Flaskのrender_templateでHTML・CSS・JavaScriptファイルを読み込む
- サーバーサイドからクライアントサイドに変数(値・リスト・辞書型配列)を渡す
- クライアントサイドで変数を処理(アサイン、フィルター、エスケープ)する
- クライアントサイドで条件分岐(if)とループ(for in)を使って、コードを簡素化する
- クライアントサイド(form)からサーバーサイドにテキストや各種コントロール、ファイルを渡す
- テンプレート継承でHTMLファイルを役割ごとに分割する
データベースに接続するデプロイする
実践編
実践編の記事では、FlaskでWebアプリケーションを公開するために欠かせないセキュリティのことや実践的なテクニックを紹介しています。
ここまで読み込めば、あとはアイディア次第でいろんなWebアプリケーションを公開できるでしょう!
セッションCookieメソッドベース・ディスパッチベーシック認証・Digest認証ログイン機能- サーバーサイドからクライアントサイドにpandas.Series、pandas.DataFrameを渡す
- クライアントサイド(form)からPOSTされた1、2次元配列を受け取る
matplotlibを使うBootstrap4を使うフォームの非同期通信(Ajax, jQuery)